April 30, 2007

{ Cuttlebugged } A Little Note of Thanks

I've had this Stampin' Up! Sassy Stems set for awhile and have been anxious to use it. This weekend was SO nice outside, that I stamped up several images and sat in the sunshine on the deck and colored them with my prismacolor pencils. Now, I've got several images all colored in and ready for cardmaking!
This is another 4-3/4" white square card covered with blue cardstock that I've "cuttlebugged" with the Stylized Flowers template. The tag was created using the Stampin' Up! Circle of Friendship set. I embossed it with the black detail embossing powder, punched with 1" circle punch, layered with 1-1/4 and 1-1/2" cardstock circles. White/black polka dot ribbon is from Walmart. Paper piercing in the top corners for an added touch. :)

Made especially for all of you that read my blog...a little note of thanks! Wishing you a happy day with many reasons to SMILE!

~ Pam :)

BLOG CANDY ALERT!!!
My sweet DIL Jami at Crazy Daisy Creations is giving away "Daisy Treats" this week in celebration of her last week of college for this semester! Please visit her blog for a chance to win an awesome clear stamp set from Rhonna Farrer called Word Art.

April 29, 2007

Can You Name This Set? { If so, this card is YOURS! }


This card is YOURS if you can tell me the name of this floral two-step stampin set! I found it at a garage sale Friday on my lunch hour for only $1.00, in the original box, in perfect condition, but with no name label. Hint: I know that it's a 1999 Stampin' Up! set.

Even if you don't know, please leave me a comment and tell me your best garage sale find! I'd love to hear from you! Have a wonderful day filled with sunshine and smiles! ~ Pam :)


Supplies: White 4-3/4" square card, patterned paper by KI Memories - Summer Dot & Summer Stripe. Stampin' Up! pink passion to edge the scallop border. Stamped with pink passion and certainly celery. Sentiment "Friends Always" is from the PapertreyInk "Faux Ribbon" set. Scalloped oval was sent to me by Glinda at the Stamp Shack. Sure wish I had that punch!
Updated 5-27-07 Shame on me for forgetting about this offer to give away this card to whoever could name this set!! I totally spaced it off, but better late than never.... The set is BRUSHSTROKE BLOSSOMS and the first person to comment and tell me that was GAIL. Gail, if you will please email me your address, I will be happy to mail this card to you!!

April 28, 2007

A Very {Special Delivery} !

You gotta love this sweet little mouse stamp from Great Impressions. This is one of the stamps that Ethel (Vintagegal) sent to me. If you missed it, last Saturday I posted a baby boy blue card with this same image. Let me know which one is your favorite! :)


Supplies: Mouse stamp by Great Impressions, Special Delivery sentiment stamp is from the PapertreyInk Faux Ribbon set. Background paper is by Bo-Bunny Press - Girl Friend Plaid. Image was colored with prismacolor pencils and blended with gamsol.

April 27, 2007

I've been "Blog Tagged"!

I've been "Blog Tagged* this week by Charmaine at Oodabug Alley and by MJ at Kreative Dryve. They are both super creative and have wonderful blogs that I encourage you to check out. I understand the purpose of blog tag is to get to know each other a little better and now I'm supposed to list 7 things about myself that you wouldn't already know. hmmm, let's see . . .

1. I was born and raised, and still live in Norfolk, Nebraska...proud hometown of Johnny Carson.
2. My first job was as a carhop for A&W Root Beer for .40 cents/hour plus tips! Oh, and .50 cents was considered a BIG tip back then! (does that ever date me?!) lol
3. My daughter's fastpitch softball team gave me the nickname of "June" - after June Cleaver of Leave it to Beaver. :) which makes #4 quite unbelievable...
4. I got a smiley face tattoo on my ankle for my 50th birthday! :) I was in Hawaii with my daughter and sister and they talked me into it. That's my story and I'm sticking to it! lol
5. I'm a smiley face collector and have a website at Smileycollector.com. I have one entire room in our home filled with my collection and a bathroom decorated with smileys too. : )
6. My car is a yellow VW beetle with personalized "smiley1" license plate.
7. I'm a very private person that experiences social anxiety, but I feel very comfortable sharing openly with my online friends. : )

Now, I want to tag anyone that reads my blog that has not already been tagged. TAG, You're IT! :) Smiles, Pam :)

My Card for 1:1 Card Challenge: { Happy Birthday Donna! }


Here is the card I created for my one-on-one card challenge with Donna (craftingcrazy). Her birthday is May 1st, so I decided that I would create a birthday card for her and sent it with a little box of stampin' goodies. She emailed me today that she planned to wait to open her gift on her birthday. But, she didn't want to wait to see the card, so she had her hubby open the box and give it to her. How funny! :) We decided last year that we were going to adopt each other as "not so secret" secret sisters. :)


[ HAPPY BIRTHDAY DONNA!
You're a very special and creative stamping friend and I've thoroughly enjoyed doing these challenges with you! ]


If you missed my previous post about our card challenge and the "rules", please read all about it below. . .

April 26, 2007

1:1 Challenge 3: { The Story of the Card }

What a FUN mail day! Isn't this card FANTASTIC?
No, I'm not bragging about one of my own creations. :) I received this terrific card in the mail today from Donna (craftingcrazy) in Oregon. She and I just completed our third 1:1 Card Challenge and mailed our cards to each other on Monday. The one she made for me arrived today and I couldn't wait to share it with all of you! I can't post a photo of the card I made and sent her until I know she's received it. (I don't want to spoil her surprise!)

Donna is *so* creative and she thought of this challenge idea. It works like the school project/game of writing a story... where after each sentence of the story you pass your paper to the next person for them to add their sentence to continue the story. We took turns giving directions for each step in creating and completing our cards.

These were our "RULES":
1. We each got 3 sentences/emails.
2. Donna started this with the color/size of the base card. That was the first of her 3 emails.
3. Each step was totally up for interpretation by the creator of the card. For example, if a step is to add a piece of patterned paper with blue and no dimensions are given, then you can do what ever you want with that piece of patterned paper. (big, little, round, square, punched etc.)
4. Each sentence has to be permanently complete. You can’t change your sentence after it moves to the next person. Example: you can't use temporary adhesive and move it later.
5. Each step should not be "too specific". Example: add a piece of black and white gingham ribbon.
6. After all 6 sentences and our cards are ready to mail, the creator can "optionally" add one last sentence to complete their card if they feel that it needs it for some reason. Example: we're all done and neither of us had a step for adding a sentiment.

Now, I'll tell you what each of our three sentences/emails were so you can see the steps we took in creating our cards:
1. Again, Donna started out by stating we should create a 5x7 RED card foldover
2. I came back with "you must stamp a background on at least 1/3 of your card front." This can be any color.
3. Donna: The addition of more color using designer background paper. No specific dimensions, but the added piece of paper must have 4 sides...and at least one of the sides must be cut "decoratively". (ie with fancy scissors, a punch or other tool you have that cuts a non-straight edge.) This paper must include the color "yellow" in it.
4. Pam: Add a sentiment or an image on cardstock that coordinates with the decorative paper you've chosen. You may use one or two other coordinating papers/cardstock to layer, if necessary.
5. Donna: It's time to accessorize! (or embellish). Step 5 includes 2 things. A punch and a piece of ribbon or fiber. Pretty wide open there! The only punch requirement is that it can't just be a 1/8 or 1/16 hold punch.
6. Pam: the last and final step for this card challenge... add one more finishing touch to your card! It can be another embellishment (i.e. tag, ribbon, brad, eyelet) or perhaps doodling, sewing, etc. Don't forget to stamp a sentiment on the inside and sign the back! : )

As soon as I know Donna has received the card I made for her, I will post a photo of it and you can see how our two cards compare! This was delightfully FUN and I recommend you try it with one of your stamping buddies! Smiles, Pam : )

April 24, 2007

{ Faux Ribbon } Birthday Wishes!


Tonight I wanted to make another card using the "Faux Ribbon" set by PAPERTREYInk. There are just unlimited posibilites with this set! I especially love all the sentiments that work so well with the circle punches, but all the different lines for creating ribbon are FUN too!
I started out with a 4-3/4" square white card and covered the bottom with a piece from the "Pocket Full of Posies Stack" by Die Cuts With a View. It's the one with *sparkles*. You can't tell it it the photo, but the flowers have glitter on them and they really do sparkle. :) The top of the card is a piece of white core textured cardstock from DCWV's Spring Stack. I put it through my Cuttlebug with the swirl embossing template and then sanded it lightly with a sanding block. The "faux ribbon" between the top and bottom was created with Stampin' Up! classic ink colors marigold morning, bashful blue and pixie pink. Really, this was a very quick and easy card to make!

April 23, 2007

I'm in Love! { Doodle This }


I'm in *LOVE* with doodling! For this card, I've used the Stampin' Up! Doodle This set from the Spring Mini catalog. I stamped in basic black and colored with prismacolor pencils/gamsol. Extra freehand doodling with a black zig pen. The friend tag is from a TAC set - Nobby Neez. White organdy ribbon with black polkadots is from Walmart. Cardstock is SU - black and certainly celery.

April 22, 2007

A New Set! { Faux Ribbon }


Yesterday I received my new PAPERTREYink "Faux Ribbon" set. It was supposed to be backordered, but my goodness it arrived in just one week! This is such a cool set with simply endless possibilities! The background paper I used is from HL ~ SEI "Granny's Kitchen". I've used the 3" scalloped giga circle punch and layered with the 1-1/4, 1-1/2, 2" circle punches. Has anyone else discovered how the little bitty doodles from the faux ribbon set stamp perfectly in the scallops? Love it!


Here's a tip for you: I bought a couple packages of these 4-3/4" white square cards w/envelopes at HL when they were 50% off! (only 1.75 ea!) They are a lighter weight cardstock, but they work perfectly if you're going to layer on decorative paper anyway. It saves on that more expensive SU cardstock I've been using. BTW, I just noticed in the HL ad this week that packaged cards/envelopes are half price again! Wooo Hooo...time to stock up! :)

{ Oh Happy Day! } from Looby Lou in Australia


Isn't this the most adorable little foldout card you've ever seen?! Omg, what a super surprise to receive this in the mail yesterday from Sarah (Looby Lou) all the way from Australia! WoW! She said that she borrowed this stamp from a friend to make me the card because it had a smiley face on it. What she didn't know is that I drive a yellow VW beetle with a sunroof. No kidding! You can't tell in the photo, but she's got a dimensional glaze on the chrome on the front end and on the driver's sunglasses. On the inside foldout she's punched out little beetle cars and doodled a road and exhaust. How delightful! And BINGO..she even sent me some extra images! Bless your heart Sarah...you made me SMILE! :)

Additional Note: Sarah said the stamp is called "Happy Car" and it's made by "Lucy Stamps", Queensland, Australia. They do have a website, but for some reason I could not get the link to post here.

April 21, 2007

{ Twinkle, Twinkle, Little Star. . .}


. . . darling baby, here you are!
That is the sentiment on this cozy little baby boy mouse card I made this morning with one of my new Great Impressions mouse stamps from Ethel at The PaperQuilter. I wanted to use this image for a baby boy card so searched through my decorative papers to find a combination to work with. I selected Baby Blue Paisley by the Paper Studio and a coordinating blue polkadot by Frances Meyer. At first I thought it was a black accent in the paisley, but it is really a dark chocolate brown. So, I layered the image with a piece of bashful blue and a scalloped square punch modified to a rectangle. The cute little sentiment and tiny blue hearts are from a Stampin' Up! set titled "Small Sayings".
Wow! Two posts in one day! I'm on a roll... : )

Memo: { Office Accoutrement } HB!

Last night I had a Stampin' Up! Stamp Club and these are the two cards we made using the Office Accoutrement set from the Spring Mini catalog. Aren't they *cool*? I didn't think I really needed this set, but now I'm tempted (again!).

{ I've been TAGGED! }

What an honor and special surprise it is to be *Tagged*! Just this week, I have been tagged 4 times by my dear stamping blogger friends. *Sweet*, especially since these are all incredible stampers with awesome blogs of their own:

Teresa ~ Aunt T's Paper Arts

Charmaine ~ Oodabug Alley

Angie ~ Stampings of the Shug

Erin ~ Erin K. Creations

I'm going to have to read up on the "tagging rules" and find out the next step. First of all, I want to say THANK YOU to my fellow bloggers for flattering me in this way! It means a great deal! Smiles, Pam :)

p.s. I had Stampin' Up! Club here at my home tonight and we made a couple terrific card designs with the Office Accoutrement set. It's really getting late now, so I'll post them tomorrow... stay tuned! :)


April 18, 2007

I WON! { What Can You Make Out of This? }


Yeah! I WON the Grand Prize in Shuggy's Contest ~ What Can You Make Out of This?
Angie at Stampings of the Shug recently held a cardmaking contest on her blog. We signed up and then she mailed each of the participants a packet of the same supplies. Once she had all the entries, she had three other stampers do the judging. The winners are being awarded "Shuggy Snacks" in the following categories:
Grand Prize: ME! :)
Most Traditional: Mary (Toao)
Cutesyest: Allison F.
Most Creative: Heather G. (hbpuppy)
This was such FUN! If you would like to see a slideshow of all the other entries and a photo of the kit she sent us, click on the link to Angie's blog in the first paragraph. :)

April 17, 2007

A New Stamp Set! { Doodle This }


Last night I assembled my new Stampin' Up! set "Doodle This" and couldn't wait to make a card because I've seen *so* many absolutely incredible creations with this set on other blogs. Well, I'm starting off with a very simple 4-3/4" square card design using patterned paper. I thought this flower coordinated with the flower in the background. Next time, I'll get more creative using the other doodle stamps! :)

I'm very grateful to Glinda from Indiana for sending me a supply of the mega scalloped circle punchies to layer with my giga punch. That was such a nice surprise to get in the mail yesterday!

Supplies: Paper Reflections white cardstock, SU Regal Rose & Chocolate Brown cardstock, and Paper Studio patterned paper ~ Bella Pink Flowers. Mega & Giga scalloped circle punches. Stampin' Up! Doodle This & Small Script. Paper Studio large brads, M's polka-dot ribbon. The flower was colored with prismacolor pencils and gamsol.

April 16, 2007

( Quote for the Day }

"Creativity is allowing yourself to make mistakes.
Art is knowing which ones to keep." ~ Scott Adams

Isn't this a terrific quote? I love it! (I guess it's because I can relate : )
Our weather was absolutely gorgeous today (in the 70's finally!), so after work I went for a walk with my dachshund Lilly. Needless to say, the evening went too fast, but I did get two new stamp sets assembled ~ "Doodle This" from Stampin' Up! and "Love You To Pieces" from Gina K. Designs. Now, I'll be ready to stamp it up tomorrow night.
Stay tuned!! Smiles, Pam :)

April 15, 2007

My Inspiration Today { Taylored Expressions }


My inspiration for this card came from Taylored Expressions: Do you want this? Taylor made and posted her fabulous card in February and I just happened to be the lucky recipient! (click on the link to see her card that inspired mine)

Ever since receiving it, I've had it displayed on the shelf above my stampin table. I simply *love* this color combination of brown and turquoise. Don't you?

It was a bit of a challenge for me to come up with my own design. I guess it's because I loved her card *so* much that I didn't want to change it in anyway! So, I started by stamping the background (Stampin' Up - Paisley) like she did and distressed it some. (If you've been reading my blog for awhile, you know that the distressed look isn't something I do very often. It just doesn't come easy for me to "mess" up my work! ; ) I've had the Stampin' Up! Designer Label kit for months and haven't used it much, so it was time. To layer around it, I cut two rectangular pieces and punched the corners of the outside one with the ticket corner punch.

Other supplies used: Scalloped giga square punch (taped two of them together for the rectangular shape behind the flower). Flower is from the Stampin' Up! Heartfelt Thanks set. Cardstock is SU Close to Cocoa, Chocolate Chip, Cool Caribbean, Taken with Teal. Slot punch was used to attach the flower piece with a brad.

{ Ode to Rubber } Stamps!

Flip Flop Sherri at The Stamp Shack posted this poem and I just had to share it here in case some of you have never seen it. I think I will print it out on cardstock, then stamp a frame for it to hang here in my stamping room! :) I can relate!

ODE TO RUBBER

I think that I shall never see
My life return to normalcy.
A life where rubber had no part
But now whose mention thrills my heart.
And keeps me thinking all the day
Of how I can find time to play.
A life where I am free to think
Of other things than stamps and ink.
And life was calm, and life was quiet,
But I saw a stamp, and I HAD to buy it.
And the rest, as they say, is history . . .
I don't have stamps . . . my stamps have me!
by- Peggy Crowe
***
{ Attn: Sharon in NE! I *think* I know who you are and I would love to get in touch with you! Thank you so much for all your sweet comments on my blog. Please email me! Smiles, Pam in NE }

April 14, 2007

{ A Bouquet of Birthday Wishes! }


This is one of those cards that I probably should have just given up on, but for some reason I was determined to use this Paper Studio patterned paper! I really like it and all the bright colors in it, but wasn't sure what to do with it. I happened to have a Flowahbella image here that was looking for a home and one thing led to another. . .
Do you think it's *too* much? : ) I did leave off ribbon, and I usually *always* use ribbon. You know, the more I look at it, I think it *needs* ribbon! lol
Tell me what YOU think, ok? The inside sentiment says "A bouquet of birthday wishes just for you!"
Supplies used: Stampin Up cardstock-lovely lilac, pumpkin pie, tempting turquoise, rose red. Paper Studio paper-bright medium flowers. Used the giga scalloped punch to cut the turquoise circle. The tag is stamped with a sentiment from SU Mini Mates and TAC Fun Tags. Flowahbella is colored with prismacolor pencils/gamsol and I doodled around her with a black Zig pen.


Featured Blog! { Crazy Daisy Creations }


My sweet DIL Jami is so talented and creative and really knows how to "think outside the box". Recently, she came up with an idea to recycle all our scraps of rubber left after assembling our Stampin' Up! sets. Please check out her blog, Crazy Daisy Creations, to see how she did this and be sure to leave a comment to encourage her!

Have a WONDERFUL Springtime Weekend!
Smiles, Pam : )

April 13, 2007

{ It's Your Day! } Virtual Swap #3


This is birthday card that I've made for Nancy's Virtual Swap #3 at The Stamp Shack. She sent me this candle image and I was to create a card using it. I started with basic black cardstock and layered on a piece of Stampin Up green galore that had been embossed with the Cuttlebug birthday template. I colored the image with prismacolor pencils and blended with gamsol. Just a very simple card for a Friday evening. TGIF!
I'm really looking forward to the weekend and spending time in my stampin room!
Smiles, Pam : )

April 12, 2007

{ Think Spring! }

In many parts of the country, you are enjoying springlike weather, but here in Nebraska it has been a very cold, windy, rainy month so far. We've even had a little SNOW! I noticed yesterday that the frost got my tulips that peaked out of the ground early. So, needless to say, I'm thinking SPRING and decided to make a "springy" card using one of the cute new rubber stamps that Ethel (Vintagegal) sent to me.
Ethel is a dear friend that I met on the Papercrafts message board a couple years ago when she still lived in California. Now that she's moved to Nebraska, I've had the pleasure of meeting her in person. What a JOY! We went to a stamp convention together and had a fun time shopping at a fabulous rubber stamp/scrapbooking store in Lincoln. Anyway, she knows I love these cute little mice stamps and she just sent me a package of six new ones. It was such a FUN surprise and very special RAK!
Be sure to check out Ethel's blog, "Paperquilter". She is a published artist who is extremely talented and creative. You'll be quite impressed!

Supplies: Stampin Up! cardstock - barely banana, certainly celery, lavendar lace, bashful blue. Floral paper is by Basic Grey-Sophie Collection. Mouse stamp is by Great Impressions, colored with prismacolor pencils and gamsol. Background stamp on barely banana is SU Simple Stripes. Background on celery is SU Petite Patterns, paper piercing on the top & bottom. Used slot punch and large brad. SU ribbon.
Remember to THINK SPRING & Keep Smiling!
Pam :)

April 11, 2007

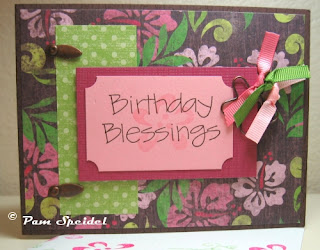
{ Birthday Blessings } for a Friend


One of my friends at work has a birthday tomorrow so I made her this card last night. She and her family vacationed in Hawaii last year and she can't wait to go back, so I thought she would like this pretty decorative paper by The Paper Studio titled "Surfer Girl Hibiscus". Isn't that a great name? I noticed that the colors are a little funky in this photo. The light and dark pinks in the papers really do blend...and the ribbon too! :)
Since the base cardstock is so dark (chocolate brown), I cut a piece of pixie pink the same as the front and attached it on the inside for the sentiment. It reads: "It's the life in your years, not the years in your life that counts." - Abraham Lincoln

April 10, 2007

{ Let's Go Fishing! }


Thanh (Yummy Creations) was so sweet to send me several stamped images of this adorable mouse by Great Impressions and I couldn't wait to color it with prismacolor pencils/gamsol and create a card. I just think it's *so* cute!
Supplies: Decorative palm tree paper by American Traditional Designs, green paper by My Mind's Eye was put through cuttlebug with the swirl embossing folder. Stampin Up brocade blue cardstock. Brown striped ribbon from M's. The Aloha smiley sunshine stamp is one I found at Ben Franklin's in the Waikiki area.

April 09, 2007

Just a *little* { SMILE } to brighten your day!

This is a very simple little 3 x 3 gift card I made yesterday. I was looking forward to using one of these cute little smiley flowers that a generous Shackie sent to me. It was fun to color in with prismacolored pencils and then I added a bit of doodling around the edge too.

Happy Monday & Smiles 2 U!!! :)

April 08, 2007

Wishing you a Happy Easter! & { Thank You! }


Yesterday, I received this absolutely stunning card in the mail from FRANCE! It was created by the talented Jacqueline deGroot to thank me for sending her the blog candy book "The Ultimate Paper Crafts Collection". I asked her permission to share it with you as it is just *so* lovely and appropriate for Easter. . .

Jacqueline wrote, "It is a special blessing for me being so far away from a craft-world where I can buy nice magazines! France is relatively poor in this area." She added, "My husband and I are missionaries in this spiritually dark country. We have four boys. Making cards is a wonderful tool of enjoyment in my life and I thank God for all my Internet contacts."

Don't you think that God wanted Jacqueline to receive that book? I believe He did.

Thank you all for visiting my blog today. Wishing you all a joyful Easter!
Pam :)

April 07, 2007

{ An Easter Prayer } For All of You . . .

Lord, Thank You for the gift of HOPE
You gave us on Easter Morning.
Because of You we know
That no problem is too difficult
And even death does not have power over us.
Thank You for the gift of JOY
You gave us when You were resurrected.
Because of You we know
That no matter how challenging life may be,
In the end we will rejoice again.
Thank You for the gift of LOVE
You gave us when You laid down Your life.
Because of You we know
That there is no sin too great to separate us
And we are incredibly valuable to You.
Thank You for the gift of LIFE
You gave us when You left the tomb.
Because of Easter we know
This world is just the beginning
And we will spend forever in Heaven with You.
We celebrate You, JESUS,
With hearts full of praise and gratitude
For who You are and all You’ve done for us!
Amen.

- Holley Gerth, DaySpring

I received this beautiful poem via email from a friend and wanted to pass it on to all my special blog friends. Wishing you all the joy and blessings of Easter! Smiles, Pam :)

Virtual Swap #3 {Trees by Rubber Stampede}

I'm in a "Virtual Swap" at The Stamp Shack hosted by Nancy (Directmailscrapper) and she sent us all the stamped tree image. It's so fun to see what everyone does with the same image. After giving it some thought, I decided not to alter the image in any way by coloring it or glitter, although now I'm thinking some glitter would bring it to life. It's certainly not a "Springy" card, but since we're still experiencing winter here in Nebraska, I guess it is appropriate!
What do you think about adding some glitter? Your suggestions would be appreciated! : )
Supplies: tree image by Rubber Stampede, thinking of you sentiment by Penny Black (I masked off "and smiling" because I wanted it to fit on a tag) Punched it out with my 1-1/4" punch and layered it with 1-3/8" chocolate brown punch. Used slot punch on the side with a large brad by The Paper Studio. Decorative paper on top is by Flair Designs - Autumn Harvest Brown and brown paper on the bottom is by My Mind's Eye. Ribbon spool from M's.

April 06, 2007

Swap with a Friend! { 1:1 Card Challenge } cont'd...

TA-DA! These are the cards Donna and I made in our 1:1 challenge. What do you think??? Isn't this *neat* how different our cards are, yet with all the same supplies?
I totally *love* how she made the flower her focal point and created the leaves out of one of the papers! This was just SO FUN we're already planning our next swap! : )

April 05, 2007

Swap with a Friend! { 1:1 Card Challenge }

Have you tried this idea for a FUN swap with a stampin friend? Read on and I'll explain...

This is the second one-on-one card challenge that I've done with Donna (craftingcrazy) in Oregon. It was her original idea and it is SO FUN! She started it all by putting together a packet of card supplies with a few "rules" for each of us to follow. We each made a card using the same supplies and then when done, we sent our creations to each other. Does this make sense?

Below is a photo of the supplies I sent her a month ago. Last weekend, we both finished our cards and put them in the mail on Monday. Yesterday, she received my card and today I received hers and it is AWESOME! Please check back tomorrow and I will post photos of both of our cards so you can see how different they are, even though we used all the same items. :)


Donna & Pam’s 1:1 Card Challenge "Rules":

We can optionally use: ( in addition, to create uniqueness)
1) one punch
2) one additional embellishment (ribbon, brad, eyelets, etc)
3) one image stamp or stamp set
4) any means of adding a sentiment to the front (i.e. pc, rub-on words, stamp)
5) we have to use ALL items in the packet, but not in it’s entirety
6) we can alter the foldover card as long as the finish size doesn’t change.
7) we can use any tool to add visual effects (i.e. piercing tool, stylus for dry embossing, sponging, and small hole punches such as 1/8” & 1/16” don’t count as your one punch in #1.
8) we can use any ink pads, markers or colored pencils
9) we must use items in our current inventory - we can't go buy anything! (dang!) LOL
10) Most important... NO STRESS! NO DEADLINE! Just have FUN!!!


If you want to see photos of our first 1:1 card challenge, you will find them HERE.

April 04, 2007

{ Altered Card Tin } Made with Aloha!

My daughter Katie in Hawaii likes me to make cards for her to use, so my DIL Jami { Crazy Daisy Creations } and I have altered a tin and filled it with a collection of cards we made. With some candy packed around the tin, it doubled as her Easter basket! :) The other photos show the inside dividers and just one of the cards.

Supplies: Provo Craft tin, Patterned Paper by Creative Imaginations ~ Island Floral & Island Stripes, Chipped Chatter Pressed Petals~ HIP chipboard letters, lots of coordinating ribbon, primas, brads.
Live & Learn Hint: this is the first one I've made and I learned that you should put a layer of mod podge on the tin before attaching the paper. I put the paper on with glue tape and then gave it three coats of mod podge. The paper bubbled doing it this way. I'm telling myself it's OK, but will do it the right way next time! : )


p.s. I thought you might enjoy seeing a photo of Katie with her Dad and I. This was taken in January at the North Shore of Oahu on a perfectly glorious day! Well, every day is a glorious day in Hawaii . . .

April 02, 2007

EeeeeeeeK!! { There's a Mouse in the House! }


First of all you must know... I really DON'T like mice!!! But, my love of these adorable mouse images started when Ethel (vintagegal) sent me the Hula Mice rubber stamp from Great Impressions. Then Thanh posted a super cute card with the mouse fishing under a palm tree. Joanne (tojoco) heard that I was looking for these stamps and sent me some images of two other mice! This is one of them and the other I'll use at Thanksgiving...a mouse with a turkey! I wonder how many of these little mouse stamps there are in all? Does anyone know?


Supplies: Stampin Up cardstock & ribbon-blue brocade. Decorative paper-My Mind's Eye, Kaleidoscope Green/Blue Multistripe. Colored the image with prismacolored pencils/gamsol and doodled the edge. "Hi" is from a TAC set Nobby Neez.

April 01, 2007

Stamp for a Cause! { AUTISM }

Have you all heard about the new stamp set released today by Gina K. Designs?

"Love You To Pieces" is not only an awesome set, it benefits such a worthy cause. This set of eight deeply etched stamps can be purchased mounted or unmounted and come in a clear plastic storage case. Gina K. Designs will donate $8.00 for every set purchased to "Autism Speaks," an organization whose mission is to provide help, raise awareness and raise money for research to help those with Autism. For more details, card samples and to find out how to purchase this set, please click the following link- Autism Stamp Set- Stamps for a Cause.

{ Barbella } ~ You Go Girl!

I'm still using images and punches that have been sent to me recently by my generous online friends from the Stamp Shack! Don't you just adore ALL the Bellas? This is "Barbella" and she's lookin' pretty good after her workout!
I've really enjoyed coloring the Bellas with my prismacolored pencils and then doodling around the edge with a fine tip zig pen.
Supplies: Stampin' Up! cardstock - green galore & barely banana. Decorative paper is from The Paper Studio - "girl dots". The sentiment "You Go Girl" is a $1 M's rubber stamp. Accented with 3" scalloped circle punch, large brads from the Paper Studio. The green galore cardstock was put through my Cuttlebug with the Bloom Dots embossing folder.